Honda Civic manuals

Subaru Legacy BN/BS (2015-2019) Service Manual: Dtc c2511 torque sensor main

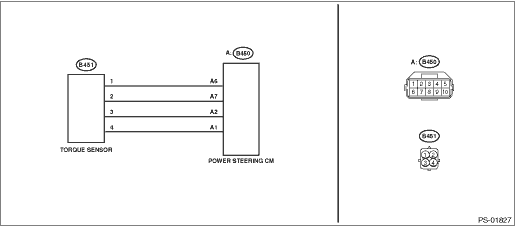
DTC DETECTING CONDITION:

When torque sensor main output voltage failure is detected after the ignition switch is ON.

TROUBLE SYMPTOM:

The steering wheel operation feels heavy.

STEERING warning light illuminates.

WIRING DIAGRAM:

Electric power steering system Electric Power Steering System

STEPCHECKYESNO

1.CHECK TORQUE SENSOR SIGNAL.

1) Display the current data of the power steering control module using the Subaru Select Monitor.

2) Check the voltage of «Torque sensor main output», «Torque sensor sub output» and «Torque sensor power supply voltage».

Are the voltage of «Torque sensor main output» and «Torque sensor sub output» 2.5±0.3 V-
Is the voltage of «Torque sensor power supply voltage» 5±0.3 V-

Check for poor contact of the connector, and check the conditions again. If the condition recur, go to the next step. Diagnostic Procedure with Diagnostic Trouble Code (DTC) > DTC C2511 TORQUE SENSOR MAIN
If it does not recur, complete the inspection.

Diagnostic Procedure with Diagnostic Trouble Code (DTC) > DTC C2511 TORQUE SENSOR MAIN

2.CHECK HARNESS.

1) Turn the ignition switch to OFF.

2) Remove the cradle. Cradle

3) Disconnect the connectors (B450, B451).

4) Using a tester and special tool harness, check the resistance between harness terminals.

Connector & terminal

(B451) No. 1 — (B450) No. 6:

(B451) No. 2 — (B450) No. 7:

(B451) No. 3 — (B450) No. 2:

(B451) No. 4 — (B450) No. 1:

Is the resistance less than 10 --

Replace the steering gearbox. Electric Power Steering Gearbox

Repair or replace the harness.

Dtc c2512 torque sensor sub
DTC DETECTING CONDITION:When torque sensor sub output voltage failure is detected after the ignition switch is ON.NOTE:Refer to “DTC C2511 TORQUE SENSOR MAIN” for diagnostic procedure. Di ...

Dtc u0126 lost communication with steering angle sensor module
NOTE:Refer to “LAN SYSTEM (DIAGNOSTICS)” for diagnostic procedure. Basic Diagnostic Procedure ...

Other materials:

Installation
1. Fabricate the cartridge nozzle tip as shown and set the sealant gun with the adhesive.(a)10 mm (0.39 in)(b)8 mm (0.31 in)(c)Sealant gun2. Smoothen and clean the adhesive surfaces of the glass - rear quarter and body using the same procedures as for the glass - front window. Windshield Glass > IN ...

© 2017-2024 Copyright www.sulegacy.com