Subaru Legacy BN/BS (2015-2019) Service Manual: Installation
1. Apply engine oil to camshaft journals, and install the camshaft. 2. Install the camshaft cap. (1) Apply liquid gasket sparingly to back side of the front camshaft cap as shown in the figure. NOTE: • Install within 5 min. after applying liquid gasket. • Do not apply liquid gasket excessively. Applying excessively may cause excess gasket to come out and flow toward cam journal, resulting in engine seizure. Liquid gasket: THREE BOND 1217G (Part No. K0877Y0100), THREE BOND 1217H or equivalent Liquid gasket applying diameter: 2.0±0.5 mm (0.079±0.020 in)
(2) Install the O-ring to the front camshaft cap. NOTE: Use new O-rings.
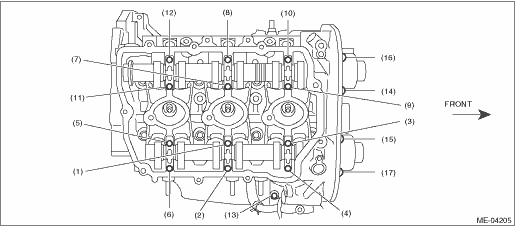
(3) Apply a thin coat of engine oil to the cap journal surface, and install the camshaft cap to the camshaft. (4) Gradually tighten the camshaft cap in at least two stages in the numerical order shown in the figure, then tighten to specified torque. Tightening torque: (1) — (12): 16 N·m (1.6 kgf-m, 11.8 ft-lb) (13) — (17): 9.75 N·m (1.0 kgf-m, 7.2 ft-lb)
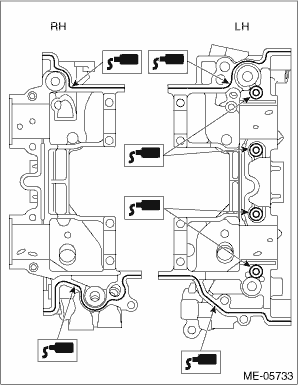
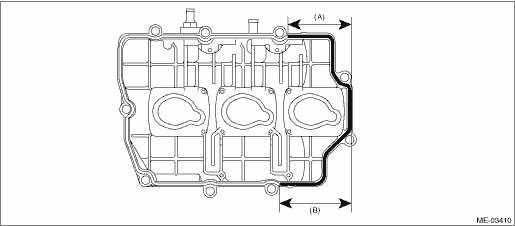
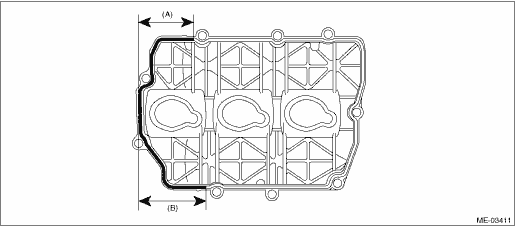
(5) After tightening the camshaft cap, ensure the camshaft rotates only slightly while holding it at base circle. 3. Install the rocker cover. (1) Install the rocker cover gasket to the rocker cover. NOTE: Use a new rocker cover gasket. (2) Apply liquid gasket sparingly to the mating surface of cylinder head and rocker cover as shown in the figure. NOTE: • Install within 5 min. after applying liquid gasket. • Do not apply liquid gasket excessively. Applying excessively may cause excess gasket to come out and flow toward cam journal, resulting in engine seizure. Liquid gasket: THREE BOND 1217G (Part No. K0877Y0100), THREE BOND 1217H or equivalent Liquid gasket applying diameter: 3.5±0.5 mm (0.138±0.020 in) • LH side
• RH side
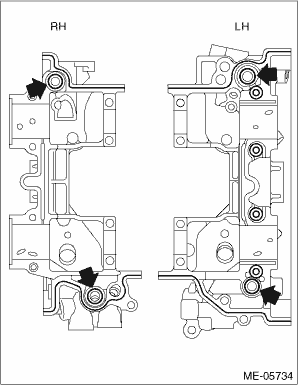
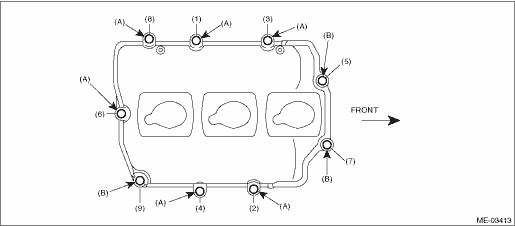
(3) Tighten the rocker cover bolts in the numerical order as shown in the figure. Tightening torque: 6.4 N·m (0.7 kgf-m, 4.7 ft-lb) • LH side
• RH side
4. Install the crank sprocket. Crank Sprocket > INSTALLATION 5. Install the cam sprocket. Cam Sprocket > INSTALLATION 6. Install the timing chain assembly. Timing Chain Assembly > INSTALLATION 7. Install the chain cover. Chain Cover > INSTALLATION 8. Install the crank pulley. Crank Pulley > INSTALLATION 9. Install the engine to the vehicle. Engine Assembly > INSTALLATION |

 Inspection
1. Measure the bend, and repair or replace if necessary.Camshaft bend limit:0.020 mm (0.00079 in)2. Check the journal for damage and wear. Replace if faulty.3. Check the cutout portion used for camsha ...
 Chain cover
...
Other materials:
Installation
1. Open the fuel filler lid.2. Insert the fuel filler pipe from inside of the rear fender.3. Install the fuel filler pipe to the vehicle body and connect the evaporation hose (A) to the fuel filler pipe.Tightening torque:7.5 N·m (0.8 kgf-m, 5.5 ft-lb)4. Align the cutout on the fuel filler pip ...
