Subaru Legacy BN/BS (2015-2019) Service Manual: Installation
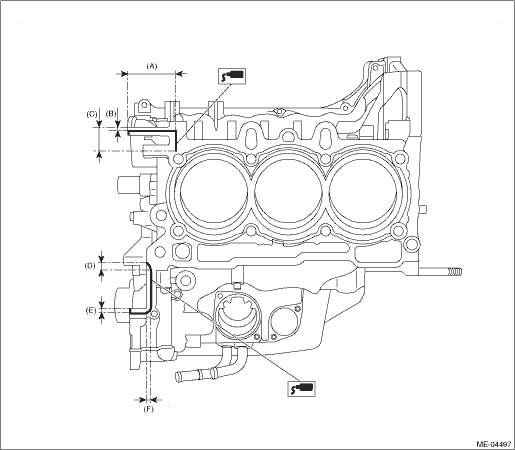
1. Apply liquid gasket to the mating surface of cylinder block shown in the figure. NOTE: • Install within 5 min. after applying liquid gasket. • Do not apply liquid gasket excessively. If too much is applied, remove any liquid gasket that is squeezed out. Liquid gasket: THREE BOND 1217G (K0877Y0100), THREE BOND 1217H or equivalent Liquid gasket applying diameter: 3.5±1.0 mm (0.138±0.039 in) • LH side
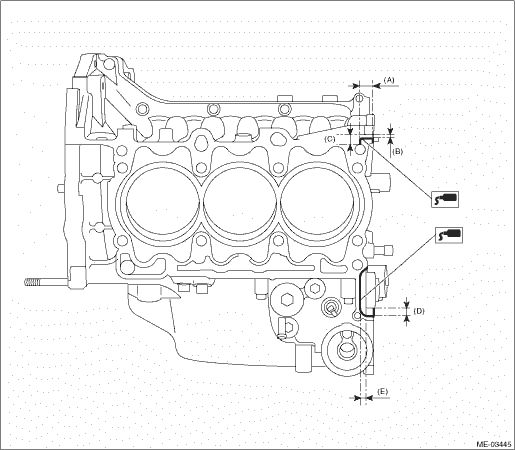
• RH side
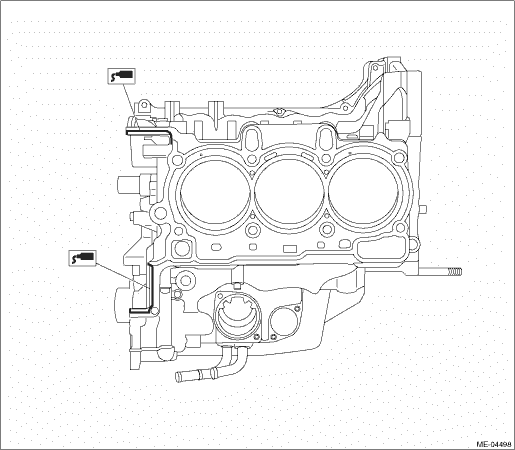
2. Install the cylinder head gaskets LH and RH onto the cylinder block. NOTE: Use a new cylinder head gasket. 3. Apply liquid gasket to the mating surface of cylinder head gasket shown in the figure. NOTE: • Install within 5 min. after applying liquid gasket. • Do not apply liquid gasket excessively. If too much is applied, remove any liquid gasket that is squeezed out. Liquid gasket: THREE BOND 1217G (K0877Y0100), THREE BOND 1217H or equivalent Liquid gasket applying diameter: 3.5±1.0 mm (0.138±0.039 in) • LH side
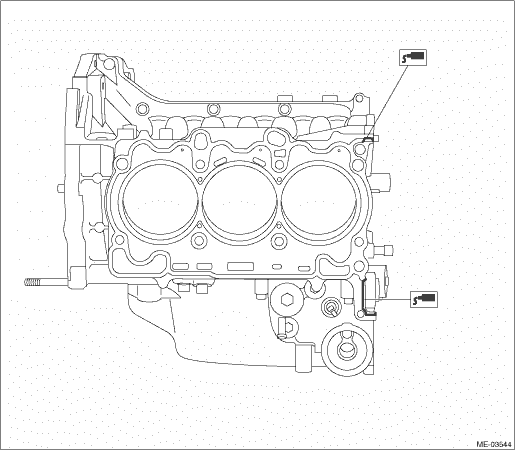
• RH side
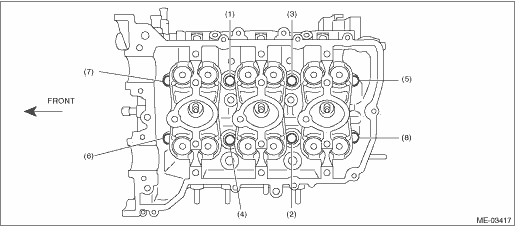
4. Attach the cylinder head to the cylinder block. CAUTION: Be careful not to scratch the mating surface of cylinder head and cylinder block. 5. Tighten the cylinder head bolts. (1) Apply a thin coat of engine oil to washers and cylinder head bolt threads. (2) Mount the cylinder head onto the cylinder block, then tighten the bolts with a torque of 20 N·m (2.0 kgf-m, 14.8 ft-lb) in the order indicated in the figure. (3) Tighten the bolts with a torque of 50 N·m (5.1 kgf-m, 36.9 ft-lb) in the order indicated in the figure. (4) Loosen all the bolts by 180° in the reverse order of installing, and loosen them further by 180°. (5) Tighten the bolts with torque of 20 N·m (2.0 kgf-m, 14.8 ft-lb) in numerical sequence as shown in the figure. (6) Tighten the bolts (1) — (4) in the order indicated with a torque of 48 N·m (4.9 kgf-m, 35.4 ft-lb). (7) Tighten the bolts (5) — (8) in the order indicated with a torque of 44 N·m (4.5 kgf-m, 32.5 ft-lb). (8) Tighten all bolts 90° in the numerical order as shown in the figure. (9) Tighten the bolt (1) — (4) by 45° in the numerical order.
6. Install the seal bolt shown in the figure. NOTE: Before installing seal bolts, apply a sealing material to bolt threads. Seal material: THREE BOND 1324 (Part No. 004403042) or equivalent Tightening torque: 6.4 N·m (0.7 kgf-m, 4.7 ft-lb)
7. Install the camshaft. Camshaft > INSTALLATION 8. Install the crank sprocket. Crank Sprocket > INSTALLATION 9. Install the cam sprocket. Cam Sprocket > INSTALLATION 10. Install the timing chain assembly. Timing Chain Assembly > INSTALLATION 11. Install the chain cover. Chain Cover > INSTALLATION 12. Install the crank pulley. Crank Pulley > INSTALLATION 13. Install the engine to the vehicle. Engine Assembly > INSTALLATION |

 Assembly
1. Install the valve spring and valve.(1) Set the cylinder head on ST.ST 18250AA010CYLINDER HEAD TABLE(2) Coat the stem of each valve with engine oil and insert the valve into valve guide.NOTE:When ...
 Inspection
1. CYLINDER HEAD1. Make sure that there are no cracks or other damages. Perform visual check, and use liquid penetrant tester on the important sections. Check that there are no marks of gas leaking or ...
Other materials:
Installation
1. Place the back plate - rear brake between the housing assembly - rear axle and the hub unit COMPL - rear axle, and tighten the bolt.CAUTION:• Do not get closer the tool which charged magnetism to magnetic encoder.• Be careful not to damage the magnetic encoder.Tightening torque:65 N&m ...
