Subaru Legacy BN/BS (2015-2019) Service Manual: Installation
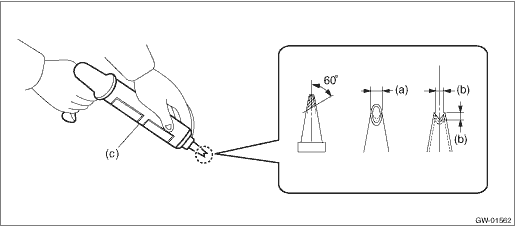
CAUTION: • For model with EyeSight, always use Subaru genuine windshield glass specially designed for EyeSight. (If the windshield glass other than the glass specially designed for EyeSight is used, the visibility of the camera is blocked or the distortion of the glass prevents the correct measurement of the object, resulting in the EyeSight abnormal operation.) • For model with EyeSight, if the windshield glass is installed after removal or replaced, always perform the “Inspection” and “Adjustment and check” of the stereo camera. Inspection: General Description > INSPECTION Adjustment and check: Camera Adjustment, Inspection • For model with EyeSight, if the damage is found in the glass repair prohibited area, always replace the glass. Damage in the prohibited area can affect the recognition of the stereo camera even if it is repaired, and thereby EyeSight function may not operate properly. 1. Fabricate the cartridge nozzle tip as shown and set the sealant gun with the adhesive.
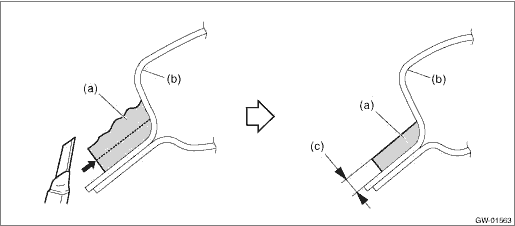
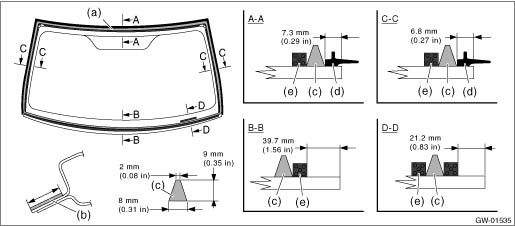
2. Remove the adhesive layer on the body using cutter knife to obtain smooth face of 2 mm (0.08 in) thick. CAUTION: • Be careful not to damage the body and paint surface. • Be sure to keep some amount of old adhesive.
3. Clean the glass - front window and the body with alcohol or appropriate cleaning solvent to completely eliminate cutting powder, dust and dirt. 4. Attach the dam rubber - front to the glass - front window.
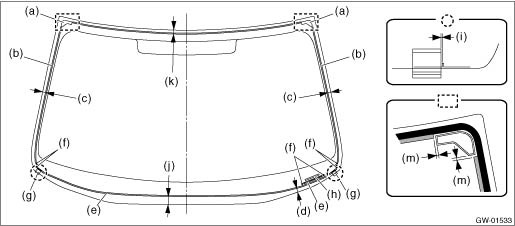
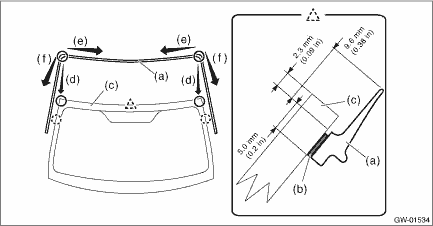
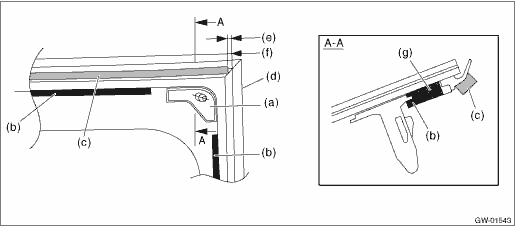
5. Attach the molding - front window to the glass - front window. (1) Align the molding - front window (a) to the upper ends (d) of the glass - front window (c). (2) Install the molding - front window from both corners of the upper edge toward the center. (e) (3) Install the molding - front window from both corners of the upper edge toward the bottom. (f) (4) Firmly apply the double sided tape (b) of the molding - front window evenly to the surface of the glass - front window. CAUTION: Be careful to attach the molding - front window so that the molding has no loose or undulating part.
6. Attach the seal - front window UPR to the molding - front window.
7. Install the glass - front window. (1) Apply the primer to the adhesive surface of glass - front window side and body side using sponge. CAUTION: Do not apply primer to adhesive remaining on the body side. Glass primer: Dow Automotive ESSEX U-401, U-402 or equivalent Painted surface primer: Dow Automotive ESSEX U-413 or equivalent NOTE: • Primer once attached to the painted surface of the body and internal trim is hard to wipe off. Mask the circumference of such area. • Let primer dry for about ten minutes before installing the glass - front window. • Do not touch the surface coated with primer. (2) Apply adhesive to the end back surface of the glass - front window. Adhesive: Dow Automotive ESSEX U-400HV or equivalent
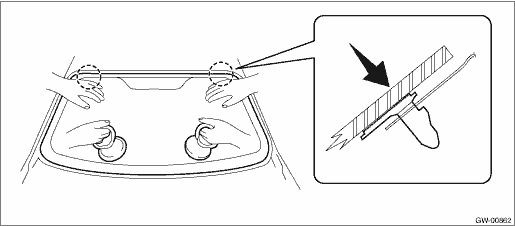
(3) Fit the locating pins - front window to the vehicle body using suction rubber cups to install the windshield glass.
(4) Lightly press the entire perimeter of the glass - front window for tight fit. (5) Make flush the adhesive surface jutted out using spatula. 8. After completion of all work, allow the vehicle to stand for about 24 hours. NOTE: • When opening/closing the door after the glass - front window was bonded, always lower the glass assembly - door first, and then open/close it carefully. • Move the vehicle slowly. • For minimum drying time and vehicle standing time before driving after bonding, follow instructions or instruction manual from the adhesive manufacturer. 9. Connect the wiper deicer connector. (Models with wiper deicer) 10. Install the cowl panel assembly. Cowl Panel > INSTALLATION 11. Install the stereo camera cover and stereo camera. (Models with EyeSight) Stereo Camera > INSTALLATION 12. Install the trim panel - front pillar UPR. Upper Inner Trim > INSTALLATION 13. Connect the ground terminal to battery sensor. (Models with wiper deicer) NOTE 14. After curing of adhesive, pour the water on external surface of vehicle to check that there are no water leaks. NOTE: When a vehicle is returned to the user, tell him or her that the vehicle should not be subjected to heavy impact for at least three days. |
 Removal
CAUTION:• For model with EyeSight, always remove the glass - front window after the stereo camera is removed.• For model with EyeSight, always use Subaru genuine windshield glass specially ...

Other materials:
Power saving function
To protect the access key battery and the
vehicle battery, the keyless access function
will be disabled as follows.
When the keyless access function and
the remote keyless entry system have not
been used:
5 days after the push-button ignition
switch has been turned off, ...
