Subaru Legacy BN/BS (2015-2019) Service Manual: Installation
1. Install the pedal assembly. Tightening torque: T: 18 N·m (1.8 kgf-m, 13.3 ft-lb)
2. Install the snap pin and clevis pin connecting the operating rod and brake pedal. CAUTION: Always use a new clevis pin. 3. Connect the connector to the brake switch. 4. Connect the connector to the clutch switch. 5. Install the steering column. Steering Column > INSTALLATION 6. Connect the tank hose to the clutch pipe.
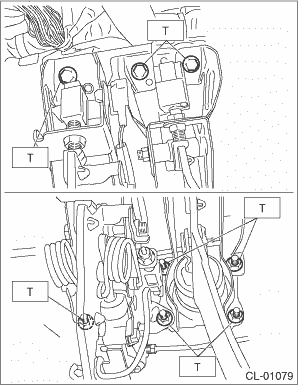
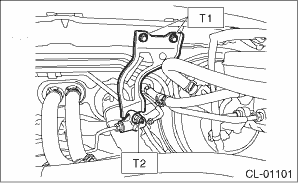
7. Install the clutch bracket. Tightening torque: T1: 7.5 N·m (0.8 kgf-m, 5.5 ft-lb) T2: 18 N·m (1.8 kgf-m, 13.3 ft-lb)
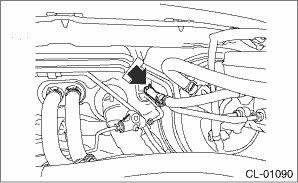
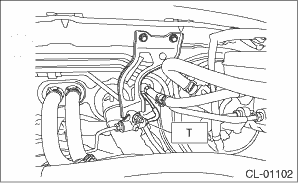
8. Install the clutch pipe to the connector. Tightening torque: 15 N·m (1.5 kgf-m, 11.1 ft-lb)
9. Fill the recommended brake fluid. Clutch Fluid 10. After bleeding air from the clutch system, ensure that no fluid leaks and the clutch operates properly. Clutch Fluid Air Bleeding > PROCEDURE 11. Install the instrument panel lower cover. Instrument Panel Lower Cover > INSTALLATION 12. Install the air intake boot. Air Intake Boot > INSTALLATION 13. Adjust the clutch pedal. Clutch Pedal > ADJUSTMENT 14. Connect the ground terminal to battery sensor. NOTE |
 Adjustment
1. If the full stroke of the clutch pedal is not within the specified value, loosen the lock nuts of the clutch switch and adjust the full stroke of the clutch pedal with the clutch switch.CAUTION:Whe ...
 Inspection
1. CLUTCH PEDALMove the clutch pedal in the lateral direction with a force of approximately 10 N (1 kgf, 2 lbf) to check that the clutch pedal deflection is within the service limit.CAUTION:If it exce ...
Other materials:
Dtc b1871 open in front seat cushion airbag rh
DIAGNOSIS START CONDITION:Ignition voltage is 10 V to 16 V.DTC DETECTING CONDITION:Open circuit failure (open circuit in rear harness, open circuit in front seat cushion airbag RH, open circuit in airbag CM internal circuit, connector connection failure)CAUTION:Before performing diagnosis, refer to ...
