Subaru Legacy BN/BS (2015-2019) Service Manual: Removal
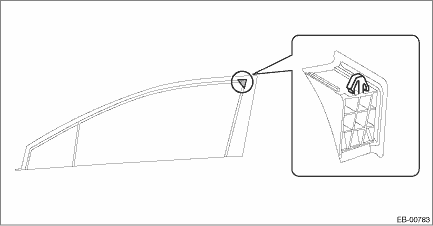
1. FRONT DOOR PANEL 1. Disconnect the ground terminal from the battery sensor, and wait for at least 60 seconds before starting work. NOTE 2. Remove the garnish assembly - door. (OUTBACK model) Side Garnish > REMOVAL 3. Remove the trim panel - front door. Door Trim > REMOVAL 4. Remove the sealing cover - front door. Front Sealing Cover > REMOVAL 5. Remove the outer mirror assembly. Outer Mirror Assembly > REMOVAL 6. Remove the front door speaker assembly. Front Speaker > REMOVAL 7. Remove the cover B pillar - front door INN. CAUTION: Always replace with a new part, because engagement of the claw weakens.
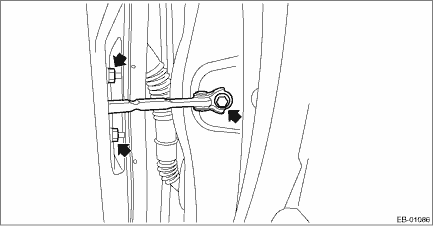
8. Remove the front door impact sensor assembly. Front Door Impact Sensor > REMOVAL 9. Remove the glass assembly - front door and the glass - front door partition. Front Door Glass > REMOVAL 10. Remove the regulator & motor assembly - front of the front door. Front Regulator and Motor Assembly > REMOVAL 11. Remove the door sash tape. Door Sash Tape > REMOVAL 12. Remove the latch and actuator assembly - front. Front Door Latch and Door Lock Actuator Assembly > REMOVAL 13. Remove the handle - door outer. Front Outer Handle > REMOVAL 14. Remove the strip - front door. Weather Strip > REPLACEMENT 15. Remove the clips and the upper hooks, and remove the cover sash - inner front. CAUTION: Do not forcibly pull the cover sash - inner front. Otherwise, the hook section of the cover sash - inner front may be damaged. 16. Remove the bolts and nuts, and then detach the checker assembly - front door.
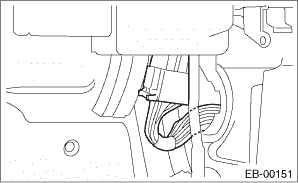
17. Remove the cover side sill - front and the front cover - side sill. Lower Inner Trim > REMOVAL 18. Disconnect the front door harness connectors. (1) Disconnect the connector of door harness from body harness.
(2) Push in the claws to remove the grommet, and pull out the door harness connector.
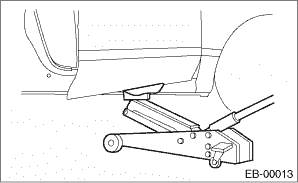
19. Before removing the panel assembly - front door, make the following preparations.
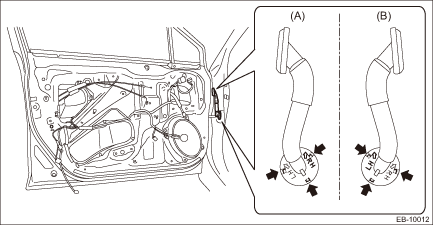
(1) Put a wooden block on a floor jack and place the jack under the panel assembly - front door. (2) Support the panel assembly - front door with the jack to protect it from damage. CAUTION: • Do not excessively lift the panel assembly - front door with the floor jack. The door hinges may be damaged. • While removing or installing, do not use a jack, etc. on the garnish section. 20. Remove the bolts on the side of the panel assembly - front door of the upper hinge - front door and the lower hinge - front door to remove the panel assembly - front door. CAUTION: The panel assembly - front door is heavy. When removing and installing it, always work in a team of two or more persons. 2. FRONT DOOR HINGE 1. Disconnect the ground terminal from the battery sensor, and wait for at least 60 seconds before starting work. NOTE 2. Remove the garnish assembly - door. (OUTBACK model) Side Garnish > REMOVAL 3. Remove the cover side sill - front and the front cover - side sill. Lower Inner Trim > REMOVAL 4. Disconnect the front door harness connectors. (1) Disconnect the connector of door harness from body harness.
(2) Push in the claws to remove the grommet, and pull out the door harness connector.
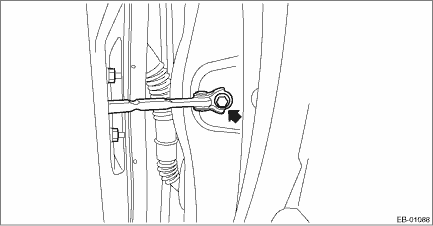
5. Remove the bolts on the vehicle side to disconnect the checker assembly - front door.
6. Before removing the door hinge, make the following preparations. CAUTION: • The panel assembly - front door is heavy. When removing and installing it, always work in a team of two or more persons. • Do not excessively lift the panel assembly - front door with the floor jack. The door hinges may be damaged. • While removing or installing, do not use a jack, etc. on the garnish section. (1) Put a wooden block on a floor jack and place the jack under the panel assembly - front door. (2) Support the panel assembly - front door with the jack to protect it from damage.
7. Remove the bolts on the side of the panel assembly - front door of the upper hinge - front door or the lower hinge - front door. CAUTION: Do not remove the upper hinge - front door and the lower hinge - front door at the same time. 8. Remove the hinge - front door from the vehicle. |
 Front door
...
 Adjustment
Adjust the clearance around the panel assembly - front door as follows.PartStandardAFender COMPL - front to Panel assembly - front door4.2±1.25 mm (0.17±0.05 in)BPanel assembly - front door to Side ...
Other materials:
Maintenance schedule
U.S. models
The scheduled maintenance items required
to be serviced at regular intervals
are shown in the "Warranty and Maintenance
Booklet". For details, read the
separate "Warranty and Maintenance
Booklet".
Canada models
The scheduled maintenance items required
to be serviced at regular i ...
