Subaru Legacy BN/BS (2015-2019) Service Manual: Removal
WARNING: Place “NO OPEN FLAMES” signs near the working area. CAUTION: • Be careful not to spill fuel. • Catch the fuel from the tubes using a container or cloth. • If the fuel gauge indicates that two thirds or more of the fuel is remaining, be sure to drain fuel before starting work to avoid the fuel to spill. 1. Release the fuel pressure. Fuel > PROCEDURE 2. Drain fuel. Fuel > PROCEDURE 3. Disconnect the ground terminal from battery sensor. NOTE 4. Remove the rear seat cushion. Rear Seat > REMOVAL 5. Remove the service hole cover of fuel sub level sensor.
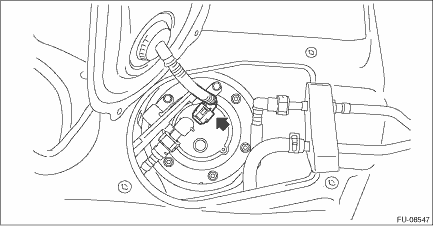
6. Disconnect the connector from the fuel sub level sensor, and move aside the service hole cover.
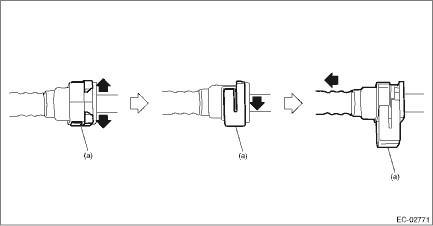
7. Disconnect the quick connector (A) of the fuel sub delivery tube, and remove the fuel sub level sensor protector. NOTE: Disconnect the quick connector as shown in the figure.
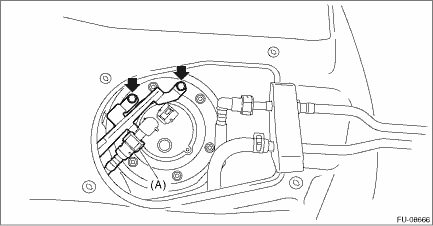
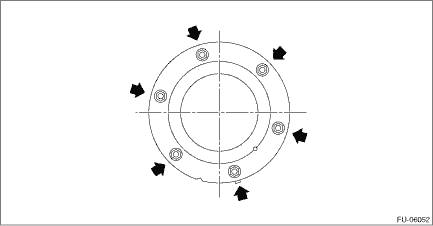
8. Remove the nuts securing the fuel sub level sensor upper plate to the fuel tank and remove the fuel sub level sensor upper plate.
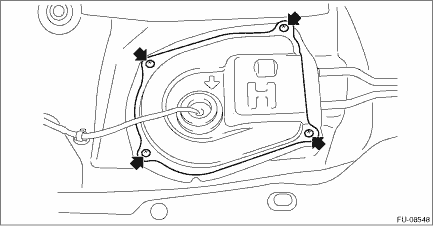
9. Remove the fuel sub level sensor from the fuel tank. CAUTION: Be careful not to let the arm and float of the fuel sub level sensor contact the fuel tank. |

 Inspection
1. Check that the fuel sub level sensor has no damage.2. Measure the fuel sub level sensor float position.(1)FULL(2)EMPTY(3)Datum pointsFloat positionStandardFULL to Datum point (A)6.4±3.5 mm (0.252 ...
Other materials:
Entering the vehicle while it is running via remote
start
Unlock the vehicle doors using the
keyless access function (if equipped) or
remote keyless entry system, then open
the door(s). If the vehicle's doors are
unlocked manually using the key, the
vehicle's alarm system will trigger when
a door is opened (if the alarm system is
armed pri ...
