Subaru Legacy BN/BS (2015-2019) Service Manual: Assembly
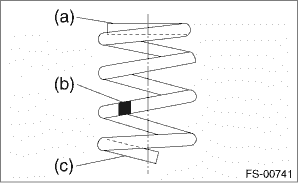
1. Before assembly, check each part. Front Strut > INSPECTION 2. Using a coil spring compressor, compress the coil spring. CAUTION: When installing the coil spring compressor to the coil spring, follow the operation manual accompanied with the coil spring compressor during operation. NOTE: Make sure that the vertical install direction of the coil spring is as shown in the figure.
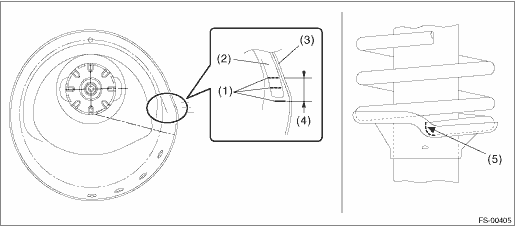
3. Set the coil spring correctly so that its end face seats well in the spring seat as shown in the figure. CAUTION: Install the coil spring so that the end of spring is between the marks on the spring seat.
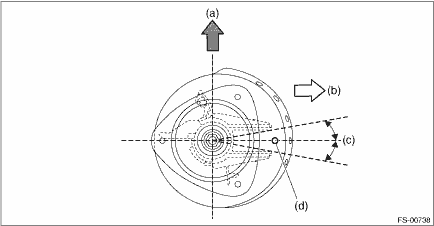
4. Install the dust cover and the helper - front strut to the piston rod. 5. Pull the piston rod fully upward, and install the spring seat and the dust cover - front strut. NOTE: Position the spring seat - front strut UPR as shown in the figure.
6. Install the spacer - front strut and the strut mount - front to the piston rod, and temporarily tighten a new self-locking nut. 7. Using a hexagon wrench to prevent strut rod from turning, tighten the new self-locking nut with ST. CAUTION: Make sure that the strut mount - front turns smoothly after tightening. Preparation tool: ST: STRUT MOUNT SOCKET (20399AG000)
Tightening torque: 55 N·m (5.6 kgf-m, 40.6 ft-lb) 8. Loosen the coil spring compressor carefully. |

 Removal
1. Lift up the vehicle, and then remove the front wheels.2. Remove the front strut assembly.(1) Place an alignment mark on the camber adjusting bolt and strut.(2) Remove the brake hose bracket.(3) Rem ...
 Installation
CAUTION:• For parts which are not reusable, always use new parts.• Check the bushing for abnormal cracks, fatigue or damage.1. Install the strut mount - front at the upper side of the stru ...
Other materials:
Installation
1. MID SWITCHCAUTION:• Before handling the airbag system components, refer to “CAUTION” of “General Description” in “AIRBAG SYSTEM”. General Description > CAUTION• Do not allow harness and connectors to interfere or get tangled up with other parts.&bu ...
