Subaru Legacy BN/BS (2015-2019) Service Manual: Installation
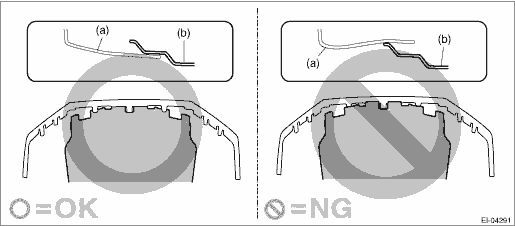
1. FENDER PANEL CAUTION: • After installing the fender COMPL - front, be sure to perform headlight beam adjustment. • Install the bumper face - front so that the front end of the under cover (b) comes inside the bumper face - front (a).
• Before installing the bumper face, match the claws on the bracket - front bumper with the engaging position of flange section on the bumper face side. If the engaging position is not correct, the flange section may be broken or the clearance between fender panel and bumper face may not be uniform. 1. Install the fender COMPL - front. Tightening torque: 7.5 N·m (0.8 kgf-m, 5.5 ft-lb) NOTE: When installing the fender COMPL - front, make sure that a uniform clearance is created around it. • Fender COMPL - front to Hood COMPL - front: Front Hood > ADJUSTMENT • Fender COMPL - front to Panel assembly - front door: Front Door > ADJUSTMENT 2. Install the cover - A pillar assembly. 3. Install the spoiler assembly - side. Side Garnish > INSTALLATION 4. Install the mud guard - front. 5. Install the light assembly - head. Tightening torque: 7.5 N·m (0.8 kgf-m, 5.5 ft-lb) 6. Install the bumper face - front. Front Bumper > INSTALLATION 7. Connect the ground terminal to battery sensor. NOTE 8. Adjust the headlight beam and fog light beam. • Adjust the headlight beam. Headlight Assembly > ADJUSTMENT • Adjust the fog light beam. (Model with fog light) Front Fog Light Assembly > ADJUSTMENT |
 Removal
1. FENDER PANEL1. Disconnect the ground terminal from battery sensor. NOTE2. Remove the bumper face - front. Front Bumper > REMOVAL3. Remove the light assembly - head. Headlight Assembly > REMOVAL4 ...
 Front hood
...
Other materials:
Removal
1. Remove the collector cover.(1) Carefully pull up the rear of collector cover at two positions (A).(2) Carefully pull up the front of collector cover at two positions (B) while moving it forward.2. Disconnect the ground terminal from battery sensor. NOTE3. Drain approximately 3.0 L (3.2 US qt, 2. ...
