Subaru Legacy BN/BS (2015-2019) Service Manual: Installation
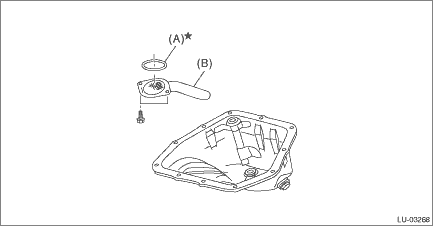
1. OIL PAN AND STRAINER 1. Attach the oil strainer to the oil pan upper. NOTE: Use new O-rings. Tightening torque: 6.4 N·m (0.7 kgf-m, 4.7 ft-lb)
2. Apply liquid gasket to the mating surfaces of oil pan upper, and install the oil pan. NOTE: • Before installing the oil pan, wipe and clean the mating surface of oil pan and oil pan upper. • Use a new oil pan seal ring. • Install within 5 min. after applying liquid gasket. Liquid gasket: THREE BOND 1217G (Part No. K0877Y0100), THREE BOND 1217H or equivalent Liquid gasket applying diameter: 5±1 mm (0.1969±0.0394 in)
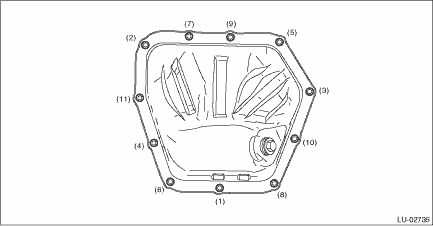
3. Tighten the bolts to secure the oil pan to the oil pan upper in the numerical order. Tightening torque: 6.4 N·m (0.7 kgf-m, 4.7 ft-lb)
4. Install the front exhaust pipe. Front Exhaust Pipe > INSTALLATION 5. Lower the vehicle. 6. Connect the ground terminal to battery sensor. NOTE 7. Refill the engine oil. Engine Oil > REPLACEMENT 2. OIL PAN UPPER NOTE: Before installing the oil pan upper, clean the mating surface of oil pan upper and cylinder block. 1. Attach the clutch housing cover to the oil pan upper. (MT model) 2. Install the O-ring to the cylinder block. NOTE: Use new O-rings. 3. Attach the stud bolts to the oil pan upper. 4. Attach the baffle plate to the oil pan upper. Tightening torque: T1: 5 N·m (0.5 kgf-m, 3.7 ft-lb) T2: 6.4 N·m (0.7 kgf-m, 4.7 ft-lb) T3: 10 N·m (1.0 kgf-m, 7.4 ft-lb)
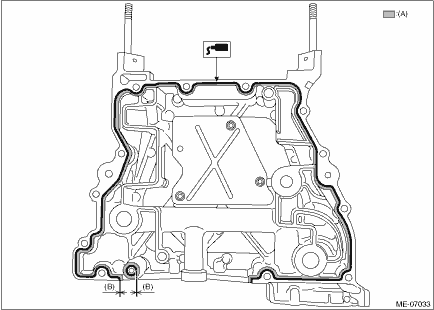
5. Apply liquid gasket to the mating surface of the oil pan upper as shown in the figure, and install the oil pan upper to the cylinder block. CAUTION: Be careful not to apply any liquid gasket to the O-ring. NOTE: • Install within 5 min. after applying liquid gasket. • Apply liquid gasket 1.5 mm (0.0591 in) outside from the chamfer surface. However, application of liquid gasket on the chamfer surface around the bolt hole is allowed. Liquid gasket: THREE BOND 1217G (Part No. K0877Y0100), THREE BOND 1217H or equivalent Liquid gasket applying diameter: 5±1 mm (0.1969±0.0394 in)
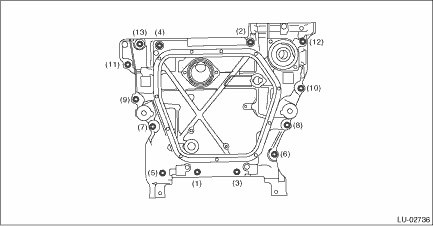
6. Tighten the bolts to secure the oil pan upper to the cylinder block in the numerical order. NOTE: After tightening, if the liquid gasket is squeezed out onto the seal surface of the chain cover, completely remove any squeezed-out liquid gasket. Tightening torque: 18 N·m (1.8 kgf-m, 13.3 ft-lb)
7. Install the oil level switch. Oil Level Switch > INSTALLATION 8. Install the oil pan. Oil Pan and Strainer > INSTALLATION 9. Install the chain cover. Chain Cover > INSTALLATION 10. Install the water pipe assembly. Water Pipe Assembly > INSTALLATION 11. Install the thermostat cover. Thermostat > INSTALLATION 12. Install the water pump. Water Pump > INSTALLATION 13. Refill the engine oil. Engine Oil > REPLACEMENT 14. Install the engine to the vehicle. Engine Assembly > INSTALLATION |


 Inspection
Check that the oil pan, oil pan upper, oil strainer and baffle plate do not have deformation, cracks or damage. ...

Other materials:
Dtc p0843 transmission fluid pressure sensor/switch "a" circuit high
DTC DETECTING CONDITION:Immediately at fault recognitionTROUBLE SYMPTOM:Shift characteristics malfunction1. ENGINE TYPE FBWIRING DIAGRAM:CVT control system CVT Control System > WIRING DIAGRAMSTEPCHECKYESNO1.CHECK INPUT SIGNAL FOR TCM.1) Start the engine.2) Warm up until the ATF temperature reaches ...
