Subaru Legacy BN/BS (2015-2019) Service Manual: Installation
1. Replace the oil seal of the differential side retainer. Differential Side Retainer Oil Seal > REPLACEMENT NOTE: • Be sure to replace the oil seal after removing the front drive shaft. • When a new oil seal has been installed, replacement is not required.
2. Strike and bend the transmission hanger of transmission rear with a rubber hammer etc. so that it gets in contact with the transmission case. CAUTION: Do not apply excessive load or impact to the transmission case.
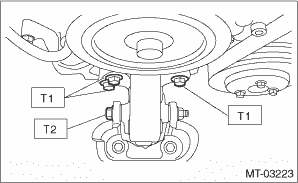
3. Install the transmission cushion rubber to the transmission, and tighten the bolt (A). 4. Install the transmission cushion rubber to the center crossmember, and temporarily tighten the nut (B). Tightening torque: Bolt (A) 35 N·m (3.6 kgf-m, 25.8 ft-lb)
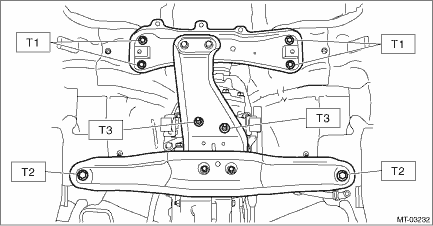
5. Install the transmission assembly onto the engine. (1) Lift up the transmission gradually using a transmission jack. (2) Engage at the spline section. NOTE: Be careful not to hit the main shaft against the clutch cover. 6. Install the front crossmember and rear crossmember. 7. Tighten the transmission cushion rubber mounting nut. Tightening torque: T1: 75 N·m (7.6 kgf-m, 55.3 ft-lb) T2: 140 N·m (14.3 kgf-m, 103.3 ft-lb) T3: 35 N·m (3.6 kgf-m, 25.8 ft-lb)
8. Take out the transmission jack. 9. Tighten the bolts and nuts which hold the lower side of transmission to the engine. Tightening torque: 50 N·m (5.1 kgf-m, 36.9 ft-lb)
10. Lower the vehicle. 11. Remove the ST (ENGINE HANGER). 12. Install the two mounting bolts on the upper side of the transmission. Tightening torque: 50 N·m (5.1 kgf-m, 36.9 ft-lb)
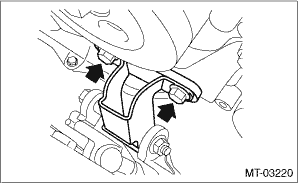
13. Install the transmission main mounting bracket. NOTE: Incline the engine, and install the transmission main mounting bracket for the left side of the vehicle first. Tightening torque: 75 N·m (7.6 kgf-m, 55.3 ft-lb)
14. Install the battery cable bracket, and install the battery cable clip to the bracket. Tightening torque: 7.5 N·m (0.76 kgf-m, 5.5 ft-lb)
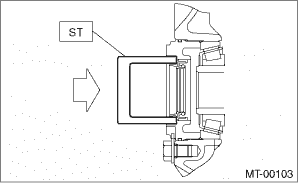
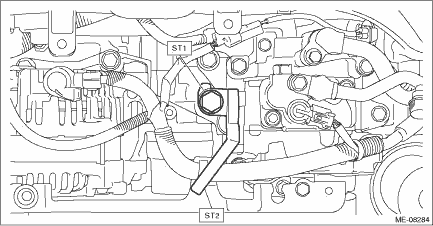
15. Attach the ST (ENGINE HANGER) again. 16. Remove the bolts from ST (SPECIAL TOOL FB).
17. Remove the bolt and nut to remove ST (SPECIAL TOOL FB). 18. Temporarily attach the front cushion rubber with bolts and nuts.
19. Tighten the bolts and nuts of front cushion rubber. NOTE: Always start tightening from the bolts on the engine side. Tightening torque: T1: 25 N·m (2.5 kgf-m, 18.4 ft-lb) T2: 45 N·m (4.6 kgf-m, 33.2 ft-lb)
20. Remove the ST (ENGINE HANGER). CAUTION: Be sure to remove the M8 bolt. 21. Remove the ST1 and ST2 from the engine unit.
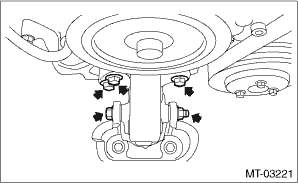
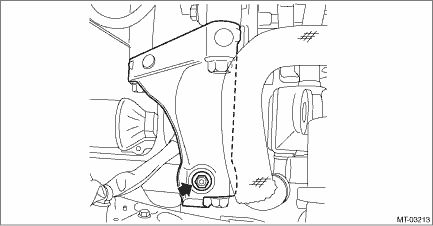
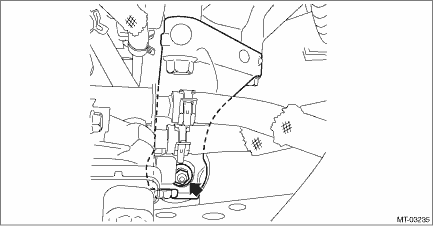
22. Tighten the nuts connecting the engine mount and the transmission main mounting bracket. Tightening torque: 45 N·m (4.6 kgf-m, 33.2 ft-lb)
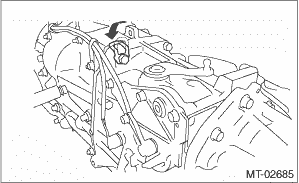
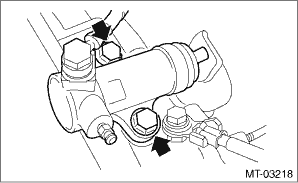
23. Install the starter. Starter > INSTALLATION 24. Install the operating cylinder. Tightening torque: 37 N·m (3.8 kgf-m, 27.3 ft-lb)
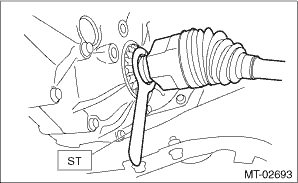
25. Lift up the vehicle. 26. Install the universal joint of the steering shaft. Universal Joint > INSTALLATION 27. Install the ST to the transmission, and then install the front drive shaft.
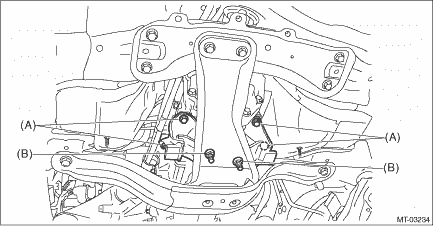
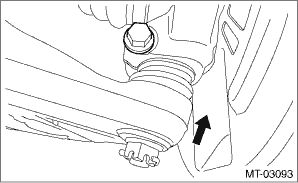
28. Insert the front arm ball joint and tighten the mounting bolt. Tightening torque: 50 N·m (5.1 kgf-m, 36.9 ft-lb)
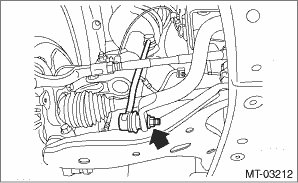
29. Install the stabilizer link. Tightening torque: 60 N·m (6.1 kgf-m, 44.3 ft-lb)
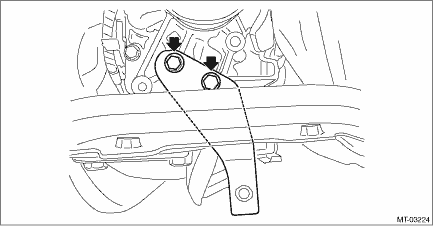
30. Install the MT gear shift cable and MT gear select cable to MT gear shift lever. MT Gear Shift Lever > INSTALLATION CAUTION: • Do not bend MT gear shift cable and MT gear select cable at a sharp angle. • Always use new MT gear select cable if the cable is removed from selector lever COMPL of transmission side. 31. Install the propeller shaft. Propeller Shaft > INSTALLATION 32. Install the hanger bracket. Tightening torque: 23 N·m (2.3 kgf-m, 17.0 ft-lb)
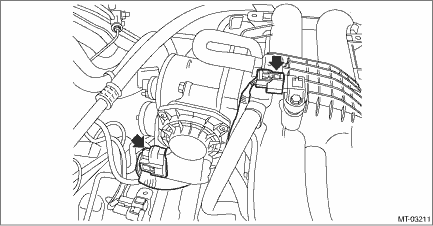
33. Install the center exhaust cover. Tightening torque: 18 N·m (1.8 kgf-m, 13.3 ft-lb) 34. Install the center exhaust pipe (rear). Center Exhaust Pipe > INSTALLATION 35. Install the front under cover. Front Under Cover > INSTALLATION 36. Lower the vehicle. 37. Connect the throttle position sensor harness connector and manifold pressure sensor harness connector.
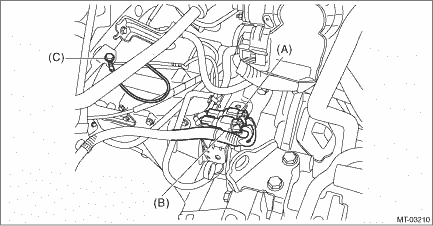
38. Connect the back-up light switch and the neutral position switch connectors, then install the transmission radio ground cord terminal. Tightening torque: 13 N·m (1.3 kgf-m, 9.6 ft-lb)
39. Pour in transmission gear oil and check the oil level. Transmission Gear Oil 40. Install the air intake boot. Air Intake Boot > INSTALLATION 41. Install the air intake duct. Air Intake Duct > INSTALLATION 42. Install the front tires. 43. Connect the ground terminal to battery sensor. NOTE |


 Removal
1. Disconnect the ground terminal from battery sensor. NOTE2. Remove the air intake duct. Air Intake Duct > REMOVAL3. Remove the clip (A) from the air intake boot.4. Loosen the clamp (B) connecting ...
 Oil seal
...
Other materials:
Installation
CAUTION:• Install the bumper face - front so that the front end of the under cover (b) comes inside the bumper face - front (a).• Before installing the bumper face, match the claws on the bracket - front bumper with the engaging position of flange section on the bumper face side. If the ...
