
Subaru Legacy BN/BS (2015-2019) Service Manual: Removal
1. Lift up the vehicle, and then remove the rear wheels. 2. Remove the trailing link. Rear Trailing Link > REMOVAL 3. Remove the lateral link assembly - front. (1) Remove the snap pin (a) and nut (b). (2) Remove the ball joint from the housing assembly - rear axle. Preparation tool: Tie-rod ball joint puller (3) Scribe alignment marks (c) on the adjusting bolt for lateral link assembly - front and on the rear sub frame assembly. (4) Remove the adjusting bolt (d), and remove the lateral link assembly - front. CAUTION: • When removing the adjusting bolt (d), make sure to fix the bolt head in place when loosening the nut (e). • Use a suitable tool appropriate to the structure, and be careful not to damage the boot of the joint while removing. The boot may be damaged depending on the tool used.
|
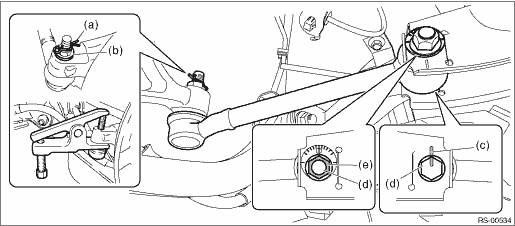

 Assembly
1. Before assembly, inspect the following items and replace any faulty part with a new one.• Visually check the lateral link assembly - front for damage and deformation.• Visually check th ...
Other materials:
Inspection
• Make sure that all component parts are free of scratches, holes and other faults.• Check the tooth contact. Drive Pinion Shaft Assembly > ADJUSTMENT• Apply CVTF to bearing and rotate the bearing to check for noise or dragging etc.• Check the starting torque of drive pinion ...
