Subaru Legacy BN/BS (2015-2019) Service Manual: Installation
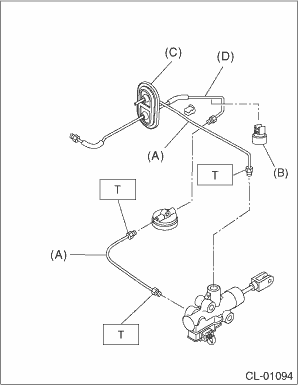
1. Install the clutch pipe to the mass damper, clutch damper, master cylinder and pipe grommet. NOTE: Temporarily tighten the clutch pipe (D) to the clutch damper. Tightening torque: T: 15 N·m (1.5 kgf-m, 11.1 ft-lb)
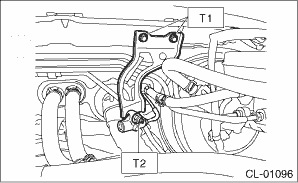
2. Install the pedal assembly. Clutch Pedal > INSTALLATION 3. Install the tank hose to the clutch pipe. CAUTION: Be sure to install the tank hose with the marking side facing upward. 4. Engage the clutch pipe with the connector attached to the clutch bracket. Tightening torque: T1: 7.5 N·m (0.8 kgf-m, 5.5 ft-lb) T2: 18 N·m (1.8 kgf-m, 13.3 ft-lb)
5. Tighten the clutch pipe. Tightening torque: 15 N·m (1.5 kgf-m, 11.1 ft-lb)
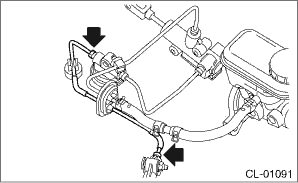
6. Install the steering column. Steering Column > INSTALLATION 7. Install the clutch hose to the operating cylinder. CAUTION: Be sure to install the clutch hose with the marking side facing upward. NOTE: Use a new gasket. Tightening torque: 18 N·m (1.8 kgf-m, 13.3 ft-lb) 8. Install the clutch hose to the clutch hose bracket, and install the clamp. CAUTION: • Be sure to install the clutch hose with the marking side facing upward. • Install the clutch hoses while making sure that there is no twisting.
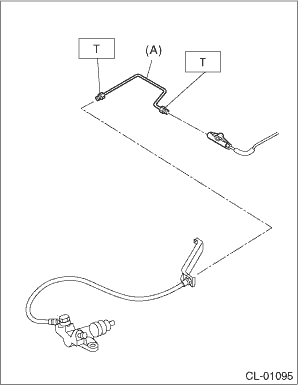
9. Install the clutch pipe to the clutch hose and connector. Tightening torque: T: 15 N·m (1.5 kgf-m, 11.1 ft-lb)
10. Fill the recommended brake fluid. Clutch Fluid 11. Bleed air from the clutch system, and ensure that no fluid leaks. Clutch Fluid Air Bleeding > PROCEDURE 12. Install the instrument panel lower cover. Instrument Panel Lower Cover > INSTALLATION 13. Install the air intake boot. Air Intake Boot > INSTALLATION 14. Connect the ground terminal to battery sensor. NOTE |

 Inspection
Check the clutch pipe, tank hose and clutch hose for breaks and damage. Check the joint for brake fluid leakage. If crack, breakage or damage is found, repair or replace the faulty clutch pipe, tank h ...
 Clutch switch
...
Other materials:
Electrical component location location
(1)Tire pressure warning light(2)TPMS & keyless entry CM*1 or TPMS CM*2(3)Snap-in type transmitter*1: Without push button start*2: With push button start ...
