Subaru Legacy BN/BS (2015-2019) Service Manual: Installation
1. Before installation, check the following items, and replace the propeller shaft assembly as necessary. • Dents or cracks on the tube surface • Splines for deformation or abnormal wear • Unsmooth joint operation or abnormal noise • Center bearing for free play, noise or non-smooth operation. • Oil seals for abnormal wear or damage • Damaged center bearing 2. Apply fluid or gear oil to the oil seal lip and the propeller shaft. Recommended fluid/gear oil:
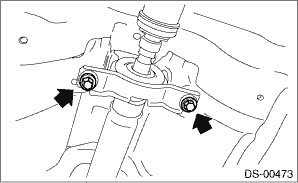
3. Insert the sleeve yoke into the transmission and attach center bearing to body. Tightening torque: 52 N·m (5.3 kgf-m, 38.4 ft-lb)
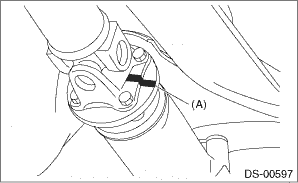
4. Align the alignment marks (A), and connect the yoke flange and rear differential. Tightening torque: 31 N·m (3.2 kgf-m, 22.9 ft-lb)
5. Check the propeller shaft with the propeller shaft installed to the vehicle. Propeller Shaft > INSPECTION 6. Install the heat shield cover. Tightening torque: 18 N·m (1.8 kgf-m, 13.3 ft-lb) 7. Install the rear exhaust pipe. • 2.5 L model: Rear Exhaust Pipe > INSTALLATION • 3.6 L model: Rear Exhaust Pipe > INSTALLATION 8. Install the front exhaust pipe. • 2.5 L model: Front Exhaust Pipe > INSTALLATION • 3.6 L model: Front Exhaust Pipe > INSTALLATION 9. Install the under cover - front. Front Under Cover > INSTALLATION 10. Lower the vehicle. |

 Inspection
Check the propeller shaft with the propeller shaft installed to the vehicle.1. Shift the select lever or gear shift lever to neutral.2. Release the parking brake.3. Lift up the vehicle.4. Remove the f ...
 Rear axle
...
Other materials:
Installation
CAUTION:When tightening the mounting TORX® screw, be sure to observe the tightening torque. Otherwise, the mount may be damaged in over-torque conditions.1. NORMAL MIRROR TYPE1. Slide the mirror assembly - inner rearview to the mirror mount to install.NOTE:If the mirror mounting is damaged, replace ...
