Subaru Legacy BN/BS (2015-2019) Service Manual: Installation
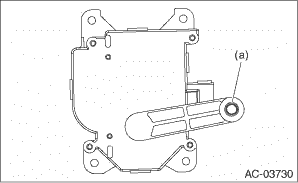
1. DRIVER’S SIDE 1. When replacing the actuator with a new part, apply a thin coat of grease evenly to the side face (a) of lever pin by using approx. 5 mm (0.2 in) width and approx. 0.1 g (0.004 oz) of grease squeezed out from a tube.
NOTE: After installing the actuator, perform 3 — 5 times of adaptation for the grease to fit in. Grease: SUBARU genuine grease (Part No. 72129AJ000) 2. Install the motor - actuator mix. 3. Install the panel - knee guard. Tightening torque: 7 N·m (0.7 kgf-m, 5.2 ft-lb) 4. Install the cover assembly - instrument panel LWR driver. 5. Connect the ground terminal to battery sensor. NOTE 2. PASSENGER’S SIDE 1. When replacing the actuator with a new part, apply a thin coat of grease evenly to the side face (a) of lever pin by using approx. 5 mm (0.2 in) width and approx. 0.1 g (0.004 oz) of grease squeezed out from a tube.
NOTE: After installing the actuator, perform 3 — 5 times of adaptation for the grease to fit in. Grease: SUBARU genuine grease (Part No. 72129AJ000) 2. Install the motor - actuator mix. 3. Install the pocket assembly and the back panel - pocket. 4. Connect the ground terminal to battery sensor. NOTE |
 Inspection
1. ACTUATOR LINK1. Visually check the operating range of the link, and remove the foreign matter if any.2. Operate the temperature control switch, and check that the link operates normally.3. If it do ...
 Air vent grille
...
Other materials:
Dtc p0458 evap system (cpc) purge control valve "a" circuit low
DTC DETECTING CONDITION:Detected when two consecutive driving cycles with fault occur.TROUBLE SYMPTOM:Improper idlingCAUTION:After servicing or replacing faulty parts, perform Clear Memory Mode Clear Memory Mode > OPERATION, and Inspection Mode Inspection Mode > PROCEDURE.WIRING DIAGRAM:• En ...
