Subaru Legacy BN/BS (2015-2019) Service Manual: Removal
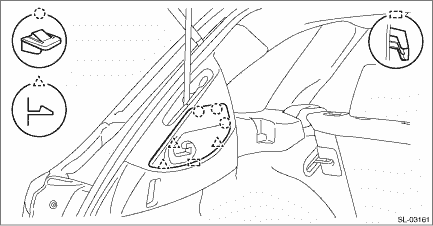
1. Hold the rear gate to the fully open position. 2. Disconnect the ground terminal from battery sensor. NOTE 3. Release the claws and then remove the cap - rear quarter pillar UPR LH.
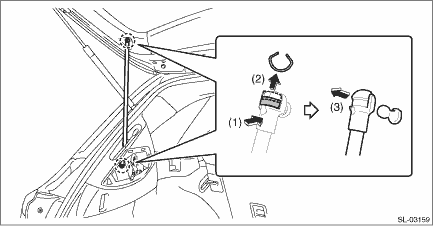
4. Remove the rod - power rear gate. CAUTION: • Using a small flat tip screwdriver wrapped with protective tape, remove the part by gradually applying force. • When the rod - power rear gate is removed, it could lead to abnormal play or noise. Therefore, always replace the stop ring with a new part. Also, be sure to check the clearance of the stop ring before installing. Power Rear Gate Rod > INSTALLATION (1) Press down the rod - power rear gate to the ball stud (bracket rod - power rear gate). (2) With the rod pressed, remove the stop ring while sliding along the ball housing groove. (3) Disconnect the rod - power rear gate from the ball stud (bracket rod - power rear gate).
|

 Inspection
Check the ball housing and ball stud (bracket rod - power rear gate) of the rod - power rear gate for excessive play, wear or bent. Replace the rod - power rear gate if defective. ...
Other materials:
List
System operation check modeNoteGREEN LED LightingGREEN LED illuminates/flashes/goes off.GREEN LED FlashingGREEN LED OFFRED LED LightingRED LED illuminates/flashes/goes off.RED LED FlashingRED LED OFFSpeaker ONOutputs to speaker. ...
