Subaru Legacy BN/BS (2015-2019) Service Manual: Replacement
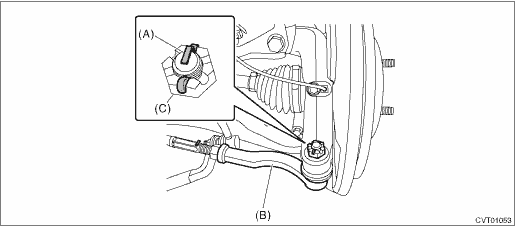
CAUTION: • Immediately after the vehicle has been running or after idling for a long time, the differential gear oil will be hot. Be careful not to burn yourself. • Be careful not to spill the differential gear oil on exhaust pipe to prevent it from emitting smoke or fire. If differential gear oil is spilled on the exhaust pipe, wipe it off completely. 1. Lift up the vehicle, and remove the front wheels. 2. After pulling off the cotter pin and removing the castle nut, use a puller to remove the tie-rod end.
3. Lift up the vehicle. 4. Remove the under cover - front. 5. Remove the center exhaust pipe. Center Exhaust Pipe > REMOVAL 6. Drain differential gear oil. Differential Gear Oil > REPLACEMENT 7. Tighten the differential gear oil drain plug. NOTE: Use a new gasket. Tightening torque: 70 N·m (7.1 kgf-m, 51.6 ft-lb) 8. Remove the stabilizer link. Front Stabilizer > REMOVAL 9. Disconnect the ball joint and housing. 10. Pull out the front drive shaft from transmission using a crowbar. NOTE: Holding the joint of front drive shaft from transmission side, pull out the drive shaft from transmission with care not to stretch the boot. 11. Remove the differential side retainer oil seal using driver wrapped with vinyl tape etc. 12. Using the ST, install the differential side retainer oil seal by lightly tapping with a hammer. NOTE: • Apply differential gear oil to the lip surface, so that the oil seal lip is not deformed. • Apply differential gear oil to the press-fitting surface of oil seal and the differential side retainer. • Oil seal has an identification mark (R, L). When installing oil seals, do not confuse the left and right.
13. Apply grease to the side retainer oil seal lip. 14. Set the ST to side retainer.
15. Replace the circlip of the drive shaft with a new part. 16. Insert the front drive shaft spline section into transmission and remove the ST (DIFFERENTIAL SIDE OIL SEAL INSTALLER). 17. Insert the drive shaft into the transmission securely by pressing the housing from outside of the vehicle. 18. Insert the ball joint into housing and secure with bolt. CAUTION: • Before tightening, make sure the bottom surface of the housing assembly - front axle and the stepped section of ball joint are in contact. • Do not apply grease to the tapered portion of ball stud. Tightening torque: 50 N·m (5.1 kgf-m, 36.9 ft-lb)
19. Install the stabilizer link. Tightening torque: 60 N·m (6.1 kgf-m, 44.3 ft-lb) 20. Install the center exhaust pipe. Center Exhaust Pipe > INSTALLATION 21. Install the under cover - front. 22. Lower the vehicle. 23. Connect the tie-rod end and knuckle arm, and attach the castle nut. Tightening torque: 27 N·m (2.8 kgf-m, 19.9 ft-lb) CAUTION: When connecting, do not hit the cap at the bottom of tie-rod end with hammer. 24. After tightening the castle nut to the specified tightening torque, tighten it further within 60° until the cotter pin hole is aligned with slot in the nut. Fit the cotter pin into the nut, and then bend the pin to lock.
25. Fill differential gear oil. Differential Gear Oil 26. Adjust the differential gear oil level, and check for leakage. Differential Gear Oil > ADJUSTMENT 27. Install the front tires. Tire and Wheel > INSTALLATION |


 Inspection
Check for leakage of gear oil from differential side retainer oil seal part. If there is an oil leak, inspect the front drive shaft and replace the oil seal. ...
Other materials:
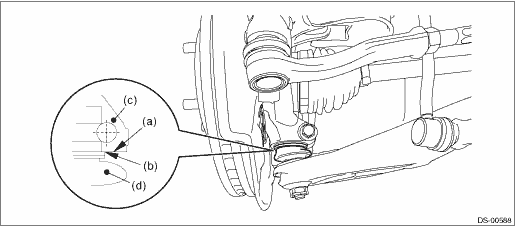
Inspection
• Inspect the drive plate facing for wear and damage.• Check the driven plate for discoloration (burnt color).• Check for worn snap ring, fatigue or damaged return spring or deformed spring retainer.• Make sure the clearance between retaining plate and snap ring of reverse br ...
