Subaru Legacy BN/BS (2015-2019) Service Manual: Adjustment
1. GEARBOX BACKLASH ADJUSTMENT (SERVICING ON VEHICLE) 1. Remove the under cover - front. Front Under Cover > REMOVAL 2. Remove the front stabilizer and slide the front stabilizer. Front Stabilizer > REMOVAL 3. Remove the front exhaust pipe. • H4 model: Front Exhaust Pipe > REMOVAL • H6 model: Front Exhaust Pipe > REMOVAL 4. Remove the bolts, then remove the guard.
5. Using the ST, loosen the lock nut and adjusting screw. Preparation tool: ST1: SPECIAL TOOL EPS (34199AJ030) ST2: SPECIAL TOOL EPS (34199AJ040)
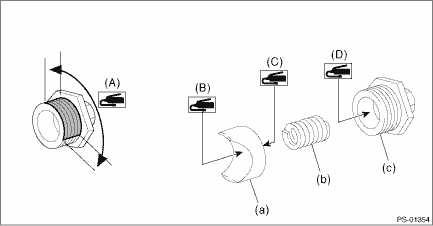
6. Apply a coat of grease to the sliding surface (B) of the pad - pressure (a) and seating surface (C) of spring - gearbox (b), and then insert the pad - pressure (a) into steering body. 7. Charge the adjusting screw (c) with grease (D), and then insert the spring - gearbox (b) into adjusting screw. Then install on the steering body. Grease: Molywhite LS-G 8. Apply liquid gasket to 1/3 or more (A) of entire perimeter of adjusting screw thread (c). Liquid gasket: SEAL END No. 22
9. Tighten the adjusting screw to 20 N·m (2.0 kgf-m, 14.8 ft-lb), then loosen it. 10. Tighten the adjusting screw to 20 N·m (2.0 kgf-m, 14.8 ft-lb) again, then loosen it. 11. Tighten the adjusting screw to 20 N·m (2.0 kgf-m, 14.8 ft-lb), loosen by 30°, and then fix the screw. 12. Install the lock nut. While holding the adjusting screw with a wrench, tighten the lock nut using ST. 13. Lift up the front wheels, turn the steering wheel to right and left, and perform the adjustment again if the steering is not smooth. Adjust by gradually increasing the angle of loosening up to 40°. Tightening torque Lock nut: 45 N·m (4.6 kgf-m, 33.2 ft-lb) CAUTION: Hold the adjusting screw with a wrench to prevent it from turning while tightening the lock nut. 14. Install the guard. Tightening torque: 30 N·m (3.1 kgf-m, 22.1 ft-lb) 15. Install the front exhaust pipe. • H4 model: Front Exhaust Pipe > INSTALLATION • H6 model: Front Exhaust Pipe > INSTALLATION 16. Install the front stabilizer. Front Stabilizer > INSTALLATION 17. Install the under cover - front. Front Under Cover > INSTALLATION 2. FRONT WHEEL ALIGNMENT ADJUSTMENT 1. Adjust the front toe. Wheel Alignment > ADJUSTMENT 2. Check the steering angle of the wheels. Standard of steering angle:
3. When the steering wheel is in the following condition, perform the steering wheel installation over again. • When wheels are set in the straight ahead position, the steering wheel spokes are not horizontal. • Error is more than 5° on the periphery of the steering wheel.
4. If the steering wheel spokes are not horizontal with vehicle set in the straight ahead position after this adjustment, correct it by turning the right and left tie-rods in the opposite direction from each other by the same angle. Also check that there are no abnormal steering effort, failure of the steering wheel to return or other faults. |


 Removal
CAUTION:• The power steering control module continues to operate after the engine stops and calculates the temperature in the control module. Therefore, before starting service of the power stee ...
 Installation
1. Before installation, check the steering gearbox. Electric Power Steering Gearbox > INSPECTION2. Install the steering gearbox assembly by tightening the bolts through the stiffener to the specified ...
Other materials:
Installation
1. OIL FILTERCAUTION:Do not tighten excessively, or oil may leak.1. Clean the oil filter installing surface on the chain cover.2. Obtain a new oil filter and apply a thin coat of engine oil to the seal rubber.3. Install the oil filter by turning it by hand, being careful not to damage the seal rubbe ...
