Subaru Legacy BN/BS (2015-2019) Service Manual: Installation
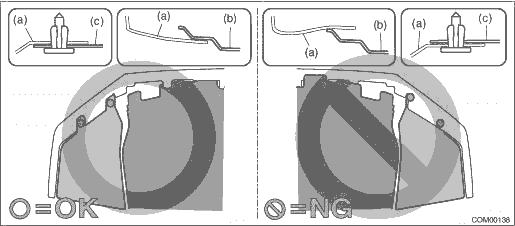
1. WASHER TANK CAUTION: • Install so that the front end of the under cover (b) comes inside the bumper face - front (a), and the front end of the mud guard (c) comes outside the bumper face - front (a).
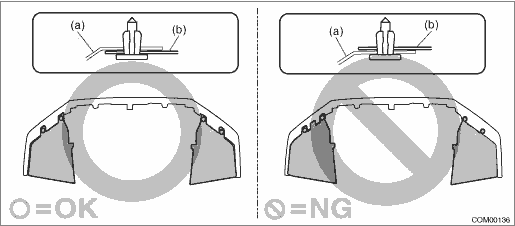
• Before installing the bumper face, match the claws on the bracket - front bumper with the engaging position of flange section on the bumper face side. If the engaging position is not correct, the flange section may be broken or the clearance between fender panel and bumper face may not be uniform. 1. Install the tank - washer assembly. Tightening torque: 6 N·m (0.6 kgf-m, 4.4 ft-lb) 2. Connect the hose - washer. 3. Connect each connector and install the harness clip. 4. Install the mud guard - front. 5. Install the bumper face - front. Front Bumper > INSTALLATION 6. Connect the ground terminal to battery sensor. NOTE 7. Add new washer fluid. 8. Adjust the fog light beam. (Model with fog light) Front Fog Light Assembly > ADJUSTMENT 2. WASHER MOTOR AND HOSE CAUTION: Install the mud guard - front so that the front end of the mud guard (b) comes outside the bumper face - front (a).
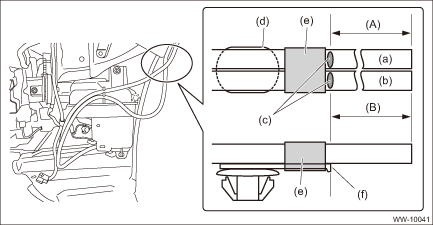
1. When the washer hose or the holder - hose is replaced, install the holder - hose in the following position. (1) Add a marking (c) at the positions (A) and (B) from the hose end. (2) Align the marking (c) with the holder end (f), and affix with tape. Tape: NITTO DENKO No. 21 or equivalent
2. Install the motor pump assembly - washer to the tank - washer. 3. Connect the hose - washer. 4. Connect each connector and install the harness clip. 5. Install the mud guard - front LH. 6. Connect the ground terminal to battery sensor. NOTE 7. Add new washer fluid. 8. Adjust the fog light beam. (Model with fog light) Front Fog Light Assembly > ADJUSTMENT 3. WASHER FLUID LEVEL SENSOR CAUTION: Install the mud guard - front so that the front end of the mud guard (b) comes outside the bumper face - front (a).
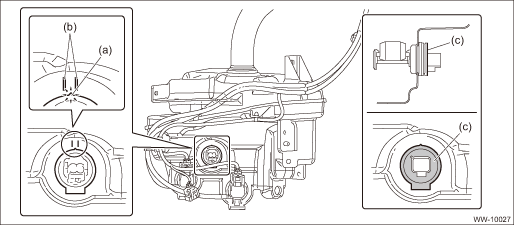
1. Align the protrusion (a) of the sensor - washer tank with a center position of double line marks (b) on the tank - washer side, and push the flat surface (c) to install. CAUTION: • Do not hit or apply any impact to the sensor - washer tank when it is reused, because it has a poor resistance to impact. • When the installation is difficult, apply washer fluid to the packing. Do not use silicone grease.
2. After installing the sensor - washer tank, perform the following confirmations. • There is no gap between the tank - washer and the packing. • There is no gap between the packing and the sensor - washer tank. • There is no turn over to the packing and its peripheral area. 3. Connect each connector and install the harness clip. 4. Install the mud guard - front LH. 5. Connect the ground terminal to battery sensor. NOTE 6. Add new washer fluid. 7. Adjust the fog light beam. (Model with fog light) Front Fog Light Assembly > ADJUSTMENT |
 Inspection
1. WASHER PUMPApply battery voltage to the connector terminal of the motor pump assembly - washer, and make sure that the motor operates.2. WASHER FLUID LEVEL SENSOR1. Check the connection status of w ...

Other materials:
Replacement
CAUTION:• Immediately after the vehicle has been running or after idling for a long time, the differential gear oil will be hot. Be careful not to burn yourself.• Be careful not to spill differential gear oil on the exhaust pipe to prevent it from emitting smoke or causing a fire. If gea ...
