Subaru Legacy BN/BS (2015-2019) Service Manual: Removal
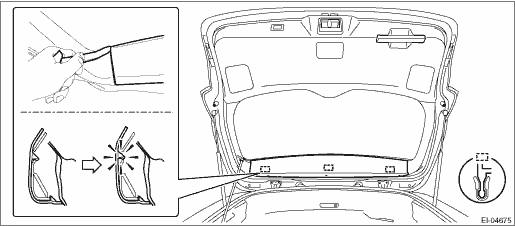
1. Remove the trim panel - rear gate UPR. (1) Remove the claws on the trim edge. (2) Release the claws in the center of trim, and remove the trim panel - rear gate UPR.
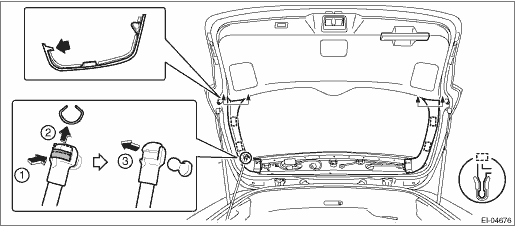
2. Remove the trim panel - rear gate pillar side. (1) Disconnect the rod - power rear gate before removing the trim panel - rear gate pillar side LH. (Only for models with power rear gate) CAUTION: For the disconnection procedure of the rod - power rear gate, refer to “REMOVAL”, “Power Rear Gate Rod” in the “POWER REAR GATE” section and observe the precautions for removal. Power Rear Gate Rod > REMOVAL (2) Release the claws. (3) Remove the claws on the bottom of trim, and remove the trim panel - rear gate pillar side.
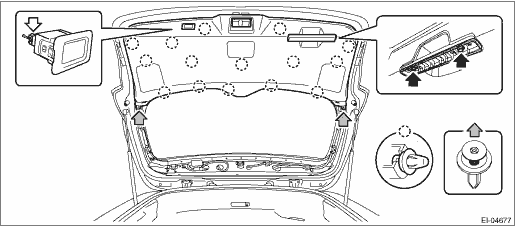
3. Remove the trim panel - rear gate LWR. (1) Remove the power rear gate inner switch and disconnect the connector. (Only for models with power rear gate) NOTE: Insert a flat tip screwdriver wrapped with protective tape into the slit on the left. (2) Remove the cover - grip, and remove the bolts. NOTE: Insert a flat tip screwdriver wrapped with protective tape into the side slit. (3) Remove the clips, and remove the trim panel - rear gate LWR.
|
 Rear gate trim
...
 Installation
CAUTION:For installation of the rod - power rear gate, refer to “INSTALLATION”, “Power Rear Gate Rod” in the “POWER REAR GATE” section and observe the precautions f ...
Other materials:
Touch screen gestures
Operations are performed by touching the touch screen directly with your
finger.
Operation method
Outline
Main use
Touch
Quickly touch and release
once.
Changing and selecting various
settings
Drag*
Touch the screen with your
fi ...
